Notification banners are useful when we need to communicate an important message or change to help center visitors. Examples include system outages, important announcements, or feature and high-profile feature changes or new releases.
The following steps detail the process of creating, editing, and removing notification banners for the edX Help Center.
...
Create a notification banner
The process to create an a notification banner or alert is simple. You create an article that contains the alert's heading and contents, add a custom label, and publish the article.
- Log in to Zendesk.
- In the upper right corner, select
 , then select Guide. The Themes page appears.
 - In the upper left corner, select Add, then select Article.
- In the left hand pane, enter the alert heading in the Title area, and add any additional content that will appear in the alert message banner. Note that banners appear on all supported devices, including smartphones. Keep the content as brief as possible to clearly convey your message.
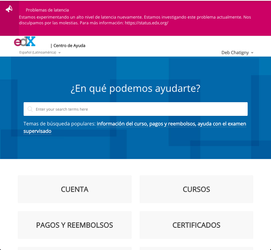
- Use the appropriate formatting options for the alert banner. For information on formatting, see Style guidelines for help articles in Guide. Here is example formatting of how the article title and article body appear in a live alert banner on a smartphone and a desktop:
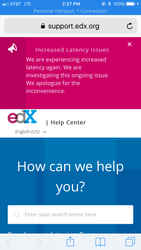 .
. 
- In the right hand pane, enter the following:
- Under Publish in section, select a category and section for the article to be associated with. While the alert banner appears on the home page only, the article will also be included in whichever category and section you select.
- Deselect the checkbox Open for comments.
Note: This is selected by default and allows commenting on articles that we are presently not staffed to moderate.
- Select Save. This saves the article to a Work in Progress state, but does not publish your articlealert banner.
- Select Preview to preview the alert banner and article in the help center. Note that testing the documentation is required.
- Repeat steps 3-7 but use with Spanish content to create the companion Spanish alert banner that will appear on the Spanish edX Help Center home page.
- The trigger for adding the alert is a custom label. In the right hand pane, in Labels, add the following:
alert-en-US to the English article
alert-es-419 to the Spanish article - Select Save.
- When you are ready to add the alert banner to the home page of the help center, in the article, select the dropdown arrow next to Save and select Publish.
This automatically publishes the article and adds it to the live help center on the home page.
...