Notification banners are useful when we need to communicate an important message or change to help center visitors. Examples include system outages, important announcements, or feature releases.
The following steps detail the process of creating, editing, and removing notification banners for the edX Help Center.
Create a notification banner
...
- Log in to Zendesk.
- In the upper right corner, select
 , then select Guide. The Themes page appears.
 - In the upper left corner, select Add, then select Article.
- In the left hand pane, enter the alert heading in the article title Title area, and add any additional content that will appear in the alert message banner. Note that banners appear on all supported devices, including smartphones. Keep the content as brief as possible to clearly convey your message.
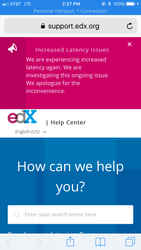
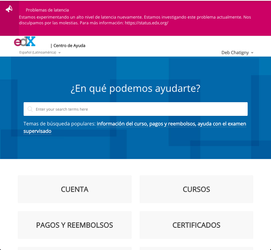
- Use the appropriate formatting options for the alert banner. For information on formatting, see Style guidelines for help articles in Guide. Here is example formatting of how the article title and article body appear in a live alert banner in the header space of the edX Help Center home pageon a smartphone and a desktop:
 .
. 
- In the right hand pane, enter the following:
- Under Publish in section, select a category and section for the article to be associated with. While the banner appears on the home page only, the article will also be included in whichever category and section you select.
- Deselect the checkbox for checkbox Open for comments.
Note: This is selected by default and allows commenting on articles that we are presently not staffed to moderate.In labels, enter the following: alert-en-US
- Select Save. This saves the article to a Work in Progress state, but does not publish your article.
- Select Preview to preview the article in the help center. Verify and test the article ithemes. Note that testing the documentation is required.
- Repeat steps 3-7 but use Spanish content to create the companion Spanish alert banner that will appear on the Spanish edX Help Center home page.
- The trigger for adding the alert is a custom label. In the right hand pane, in Labels, add the following:
alert-en-US to the English article
alert-es-419 to the Spanish article - Select Save.
- When you are ready to add the alert banner to the home page of the help center, in the article, select the dropdown arrow next to Save and select Publish.
This automatically publishes the article and adds it to the live help center on the home page.
...
- Log in to Zendesk.
- On the left, select Manage articles.
- Locate the help center alert message article that needs updating. to be removed. The easiest way to find this is to filter on label:
alert-en-US for English alerts
alert-es-419 for Spanish alerts
You can do this by using entering the alert label into the search field, and /or by filtering to control the articles that you see.Copy the article title and article content. You will be pasting this into a new article, as today Zendesk does not offer a way to more formally control versionsby filtering on Label. - In the upper left corner, select Add, then select Article (or category or section).
- Paste in the article title, and add the word DRAFT at the end of the title. Paste in the article contents. For information on formatting, see Style guidelines for help articles in Guide.
- Select Save to save your changes.
- Verify and test the article by selecting Show in Help Center. This launches the article in the current theme and shows how the article will appears once it is live in right hand column, in Labels, remove the alert label.
- Under Save, select Unpublish. This changes the article to a Work in Progress state, removes the banner from the home page, and removes the article from the help center.
- Note that article styling, especially if you've copied in content from another source or document, will not always display as expected. You may have to select Source code
 , located in the editor toolbar, to adjust the formatting, or reformat the text within the editor window. Note that testing the documentation is required.
 - When the feature releases and you want to publish the help article, locate the current article via title, which will show both the live and draft versions.
- Open the draft article, and copy all of the article contents. Overwrite the live article by pasting the draft content into the live article.
- Select: if you select Save to save your changes. This will set , the article workflow at state will be Work in Progress. The unchanged , but the article is still live , and the changes to the article are not yet visible.
- Verify and test the article by selecting Show in Help Center. Fix any formatting issues, then save and preview the article again, until you are satisfied with the output. Note that saving to a live article publishes the updates automatically, so you need to fix formatting issues immediately.
- Delete the draft when you have updated and the live article and no longer need iton the help center.
- Launch the help center to verify that the banner, and article, have been removed.