MANUAL LAUNCH: edx-video-pipeline testing
NOTE: This documentation is for manually launching a sandbox VEDA via terraform
For the easy way - LOOK HERE
Before you Start:
You'll need access to the edx/terraform repository.
VEDA is a cluster of 9-12 machines, all performing different roles. In order to test we need to build and deploy "toy" versions of both "edx-video-pipeline" and "edx-video-worker" on a smaller instance. There's a compressed version of this that uses the same codebase on a smaller, less performant infrastructure plan located in the edx/terraform repository in terraform>plans>veda>sandbox. Clone this repo and navigate to this folder.
Within this repo you'll see a terraform.tfvars file and a instance_config.bk file. You'll be making edits to both before running any plan.
Build and Configure a Sandbox1
- Start a sandbox building.
- Make sure to build with basic auth off.
- While that's baking, you'll need an AWS hub account.
Once the sandbox is completed building, access your sandbox via ssh.
Change these settings in
/edx/app/edxapp/cms.env.json"FEATURES": {..."ENABLE_VIDEO_UPLOAD_PIPELINE": true,...},and
...VIDEO_UPLOAD_PIPELINE={"BUCKET":"${YOUR_SANDBOX_DNS}-vedaupload","ROOT_PATH": "ingest/"},...and
...
"VIDEO_IMAGE_SETTINGS": {
        "DIRECTORY_PREFIX": "video-images/",
        ...
        "STORAGE_KWARGS": {
            "bucket": "${YOUR_SANDBOX_DNS}-vedaimages",
            "custom_domain": "s3.amazonaws.com/${YOUR_SANDBOX_DNS}-vedaimages",
            ...
        },
        ...
    },
    ...
}
...
and for transcript bukcets
...
"VIDEO_TRANSCRIPTS_SETTINGS": {
        "DIRECTORY_PREFIX": "video-transcripts/",
        ...
        "STORAGE_KWARGS": {
            "bucket": "${YOUR_SANDBOX_DNS}-vedatranscripts",
            "custom_domain": "s3.amazonaws.com/${YOUR_SANDBOX_DNS}-vedatranscripts",
            ...
        },
        ...
    },
    ...
}
...
Configure Bucket Access (TEMPORARY)
NOTE: There is a ticket in to AWS Support about a bucket permissions issue.
Please contact Ops/Neem/Mallow about getting a bucket provisioned for uploads until this is resolved.
Add the following to
/edx/app/edxapp/cms.auth.json... "AWS_ACCESS_KEY_ID": "${AWS_ACCESS_KEY}", ... "AWS_SECRET_ACCESS_KEY": "${AWS_SECRET_ACCESS_KEY}", ...More information can be found here. Make sure you're in the appropriate hub account role when generating keys. NEVER SHARE THEM
- While you're at it, create a superuser (The provided example sets 'staff' as a superuser, which is just fine)
Restart your servers and workers. (Don't forget to exit from the sudo user first
Configuring VAL Access3
- If you haven't, access your sandbox via ssh and create a superuser.
- Log in to the django admin (usually ${YOUR_SANDBOX_URL}/admin)
Go to
Oauth2 > Clients- Click
'Add Clients'(rounded button, upper right hand corner) - In the window, add the following information:
- User: Staff (usually pk=5, but the magnifying glass icon can help)
- Name: ${ANY RANDOM STRING} (e.g. 'veda_sandbox')
- URL: https://${YOUR_SANDBOX_URL}/api/val/v0
- Redirect uris: https://${YOUR_SANDBOX_URL}
- Client ID: autofilled, make note of this
- Client Secret: autofilled, make note of this
- Client Type: Confidential (Web Application)
- Logout URI: (can leave blank)
Make Note of the Client ID and Client Secret, as these will be needed later for your
Remember to Save!
Terraforming
(If you haven't already), clone the edx/terraform repo on your local machine.
git clone https://github.com/edx/terraform
Assume an appropriate IAM role (for example 'veda-admin', though any role with EC2 and S3 privileges is acceptable) via your edx-hub account in the command line.
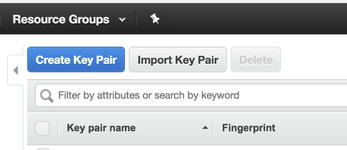
- (If you don't have one) Generate an ssh key in the AWS Console > NETWORK&SECURITY (under the appropriate IAM role). Retain this key and the name.
- A NOTE ABOUT REGIONS: Your ssh key is region specific. You can change from us-east-1 (default at edX Cambridge), but you'll also need to change the
aws_regionvariable interraform.tfvars
- A NOTE ABOUT REGIONS: Your ssh key is region specific. You can change from us-east-1 (default at edX Cambridge), but you'll also need to change the
In
terraform>plans>veda>sandbox>terraform.tfvarson your local machine, input the various keys and urls you've collected so far./* */ // The URL to your sandbox instance, stripped of the 'https://' sandbox_dns_prefix = "{YOUR_SANDBOX_DNS_PREFIX}" # (Usually a github handle) // AWS Authentication Information (This can remain unchanged) aws_region = "us-east-1" // Full path to your private AWS SSH key private_key = "${FULL_FILEPATH_TO_YOUR_KEY}" // The key pair name, as AWS knows it key_pair_name = "${YOUR KEY NAME ACCORDING TO AWS}" // Your local machine's public IP local_ip = "${YOUR_LOCAL_IP}/32" rabbit_user = "${Any Random String}" rabbit_pass = "${Any Random String}"In
terraform>plans>veda>sandbox>instance_config.bk, (NOTE the `bk`) make changes to the following field... django_secret_key: ${A LONG RANDOMIZED STRING} ... veda_noreply_email: [leave blank] admin_email: ${Your email (for server alerts)} ... # Credentials val_client_id: ${VAL Client ID} # From 'Configuring VAL Access' val_secret_key: ${VAL Client Secret} # From 'Configuring VAL Access' val_username: ${Staff account Sandbox/Studio Username (usually 'staff')} val_password: ${Staff account Sandbox/Studio Password (usually 'edx')} ...NOTE: NEVER commit this back into a public repo. This is now full of secrets.
- Now
cdintoterraform/plans/veda/sandboxterraform plan
Should cycle through without an error, and show you a comprehensive plan for what will be built.
Now you're ready to go. The terraform plan should create your buckets and worker, and provision your worker. It will also begin running the various worker processes for your VEDA sandbox.
terraform apply
Configuring edx-video-pipeline
SSH into your ec2 instance's public ip (in the terraform generated '
terraform.tfstate' file) and create a superusersshssh -i ${full_path_to_aws_key} ec2-user@${ec2_public_ip} python edx-video-pipeline/manage.py createsuperuser # enter same info as edx sandbox superuser (optional, but easier)
Configuring Sandbox Studio
Now log in, via web browser (utilizing a staff-access account) to your sandbox studio interface.
- Either create a unique course or navigate to one of the stock courses.
- In the course you wish to use, navigate to
Settings > Advanced Settings At the bottom of the page, in the
"Video Upload Credentials"field, add the following configuration (don't neglect the brackets).2{ "course_video_upload_token": "xxxx" }
You should now be able to see the
Content > Video Uploadoption in your sandbox CMS.
Configuring the VEDA API
Find your veda sandbox IP located at "public_ip" under "veda_sandbox" in the auto-generated `terraform.tfstate` file:
{ "version": 3, ... "modules": [ { "path": [ "root" ], "outputs": {}, "resources": { ... "aws_instance.sandbox-veda": { "type": "aws_instance", "depends_on": [ "aws_iam_role.veda_sandbox", "aws_security_group.sec_sandbox" ], "id": "yro_sandbox", ... ... "primary": { ... "attributes": { ... "public_ip": "52.91.206.12", # <--HERE ...- Navigate to
http://${VEDA_SANDBOX_IP}:8000/admin- In DjangoOauthToolkit>Applications click 'add application' (Upper Right Corner)
Setup the new record with the following entries:
Client id: # Make a note of this
User: 1 # (Staff/Superuser)
Redirect uris:
    'http://localhost:8000/o/token'
Client type: Confidential
Authorization grant type: Client credentials
Client secret: # Make a note of this
Name: ${ANY_RANDOM_STRING}
Skip authorization: True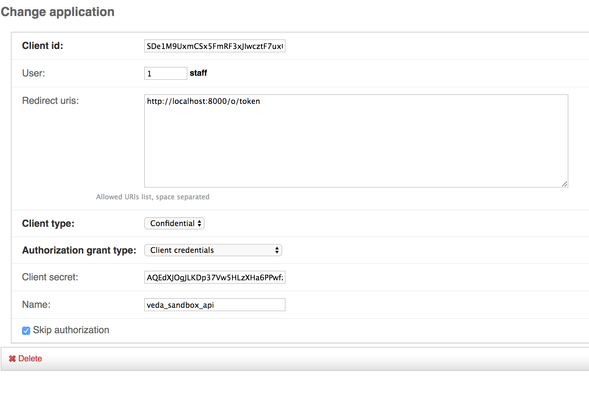
SSH into your ec2 instance's public ip (in the terraform generated '
terraform.tfstate' file) and edit the 'edx-video-worker/instance_config.yaml' file.... ## VEDA API Auth veda_api_url: http://${VEDA_SANDBOX_IP}:8000/api veda_auth_url: http://${VEDA_SANDBOX_IP}:8000/veda_auth veda_client_id: ${OAUTHTOOLKIT_CLIENT} veda_secret_key: ${OAUTHTOOLKIT_CLIENT_SECRET} veda_token_url: http://${VEDA_SANDBOX_IP}:8000/o/token veda_base_url: http://${VEDA_SANDBOX_IP}:8000/ ...Then from the prompt run the following commands:
nohup /home/ec2-user/edx-video-worker/worker.sh &>/home/ec2-user/logs/worker.out&
Running
You should now be able to upload a video file (here's a sample) and have it process (you might need to get a snack, this can be slow). Eventually it should resolve to look like this:

Not working?
Let's check the logs. You can find your video pipeline sandbox's ec2 public IP in the terraform generated 'terraform.tfstate' file
Logs are accessible here:
ssh -i {{your_aws_ssh_key}} ec2-user@{{video pipeline sandbox's ec2 public IP}}


	# Django Output
	cat ~/logs/server.out


	# Ingest (File Intake)
	cat ~/logs/ingest.out


	# Deliver (File Upload to Endpoint)
	cat ~/logs/deliver.out


	# Worker (Celery Encode Worker (edx-video-worker output)
	cat ~/logs/worker.out


	# RabbitMQ Output
	cat ~/logs/rabbit.out
While this EC2 instance is up, do NOT remove the openveda repo on your local machine. Terraform leaves a bunch of state information (in the form of 'terraform.tfstate' files) that terraform will need that to eventually move to the next step:
Shut it down
cdintoopenveda/terraformterraform destroy
Notes:
- Adapted from the edx-platform wiki
- The course_video_upload_token can be any non-null string, and it is important in production, where we need to differentiate between thousands of video workflows, on the sandbox we're simply using a single workflow, so use any non-null string, but track it, as you'll need it in the django admin of your veda instance.
- This is extremely bad and shameful. Do NOT use this in a production setting. You should follow the instructions of your friendly devops engineer.
- Don't forget to terminate your EC2 instance!